Wednesday 15 February 2017

Remove Horizontal Banding Line on Prints from Epson Printer


If you are facing problem with print quality from your Epson printer, first of all take a Test print. Then, compare that test printing with the illustrations as under. click the caption under the instance that first-class resembles your printout. There various much more procedures to cure such print quality problems caused because of several errors and technical issues, to get technical assistance to resolve any advanced queries there is 24/7 available help from Epson Support.

To solve problem of Horizontal band lines on taken prints, try one or more than one of the following solutions:
Read More:
3 Steps to Run Epson Connect 
  • Ensure that the printing side of the paper is kept facing towards the sheet feeder. Run the Head Cleaning Utility (manually or using software) to clear any problem or clogged in ink nozzles.
  • From the Epson printer software run the Print Head Alignment utility.
  • Reset all customized settings to default by selecting Mode setting from Epson printer software's at Main menu of windows or at the Print dialog box of Macintosh as Automatic.
  • Check the ink out light. If the light is flashing, you have to replace the appropriate ink cartridge.
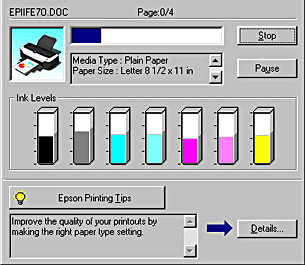
  • Check different color Ink level of cartridge.
  • Make certain that Maximum isn't selected the option of Printable area setting from your printer software. whilst this placing is chosen, banding may also occur in the accelerated region. 
  • Make it sure that the Media type selected inside the printer software program is appropriate for the kind of media loaded within the printer. 
  • Ensure the MicroWeave take a look at container is selected while to be had within the Advanced dialog box. For home windows users, see Making Advanced settings for information. For Macintosh users, see Making superior settings.
Epson Help: Available for customers of Epson products on Epson technical support phone number and Epson techical support chat. You can avail services of technical assistance at any point of time for general inquiry, query or ask for the Epson remote technical support by the professionally expert technicians.

Tuesday 7 February 2017

Why Wireless Epson Printers are Best?


Epson printers are knows for its printing qualities at most, which is maintained by the its manufacturers all over the past few decades. As All in One Epson printer is been an elite model of future it has been designed with most recent upgraded technologies while manufacturing, and drivers containing set of software to communicate with printer are regularly upgraded with latest developments that can be downloaded from online sources.

Scanner is another important feature provided in All in One Epson printers. People use there smart phones and other gadgets for uploading soft copy of any document but clarity is major issue with them at many points. To get better quality of scan copies Epson has gradually developed scanner with fine piece of glasses. That too helps customer to use same machine for the purpose of photocopy and Fax. Hence, quality of wireless connectivity is enhancing because of its long list of applications and add-on for many more utilization. For any issue regrading Wireless connectivity there is technical support provided by Epson as it gets much more complex for users to handle, or customer can have expert technicians to deal with fault and errors by Epson Help.

Wireless Connectivity:

Almost every printer have Ethernet cable connectivity and mostly have option to connect with USB cables too, but with high level of research advancement we have best mode to connect printers with various peripheral devices i.e. wireless connectivity. Basically wireless connectivity eliminates web of wires from your system along with much more applications than any other mode of cable connectivity. Epson All in One Printer has inbuilt WiFi that enable you to connect with any devices by the mean of wireless network. Generally, this has much more advantages are like
  • Use printer with any device connected on the same wireless network without any virtual connections using Cables.
  • Connect Smart phone, iPhone, iPad, Tablet, Kindle, Laptop, etc easily with your wireless Epson printer.
  • Directly give print from Cloud Drive or save scan copy directly to the Cloud drive such as OneDrive, Skydrive, Dropbox, Google Drive, etc easily by these printers.
  • Registered Epson printers with the Epson Connect can use registered Email account with its IP address, print job can be send directly from Email to printer similarly scanned copy can be send to that Email account.
  • Connect Epson All in One printer with wireless Internet network to enable the feature of Fax machines that is not possible with wireless connectivity.

Monday 30 January 2017

How to Check Epson Printer Operation

If Epson print quality is not up to the mark or its not operating at all, then there is an obvious problem. To deal with such problems you need to find fault first that may be in printer itself or can be from the connected computer. Mostly the printer problems are hardware and computer connectivity are software related problems. To determine the cause of error best option is Epson Printer Operation

Printer Operation Check

Epson Printer Support, share steps to run printer operation check manually are:

Step 1:

Ethernet Cable connectivity: Turn OFF both Epson printer and connected computer, then unplug Ethernet cable connected with printer

USB Cable connectivity: Turn ON connected computer and turn OFF Epson printer.

Step 2:

Load paper A4 or letter head size paper on to paper tray, paper quality should be compatible with your printer model. Make sure loaded papers are aligned properly within slot of Epson printer paper tray.

For technical assistance click ⇒ Epson Support

Step 3:

paper button 
  power button 
  • Press both buttons together simultaneously.
  • When printer turns ON, release power button.
  • When printer operation check starts print, release paper button.

Analyze print
 
Fig 1. Epson Printer Software Problem
Fig 2. Epson Printer Hardware Problem


Friday 27 January 2017

How to Connect Epson Printer with Windows Computer

7 Steps to connect your Epson printer with windows computer with Ethernet Cable or Wireless Network by using utility software "Epson Connect Printer Setup" are:

Step 1: Download Epson Connect Printer Setup Utility, then
Run Software setup.
Step 2: Read End-user License Agreement and check, then
Select box "I accept the terms in the License Agreement" , and then
Click "Next"
Step 3: to start installing Epson Connect Printer Setup, then
Click "Install", and then
Click "Finish"

Technician guidance and services to connect Epson printer with computer Call Toll Free Epson Tech Support Number

Step 4: Select your printer you want to setup from the list, and then
If your Epson printer is not found in list, then
Click "Search Again"

[Note: If Epson printer is connected with USB cable with the windows computer, then reconnect your printer with computer network using Eternet Cable or Wireless network]
Click "Next"
Step 5: Register a Epson printer to Epson connect
Select "Printer Registration", and then
Click "Next"
Step 6: Read License agreement and privacy statement, then
Select "Agree"
Click "Next"

Step 7: Register you Epson printer to Epson Connect
On Dialog box with message "Register a printer to Epson Connect"
Click "OK"
Option 1: If you are a new user of Epson, and "Create an Epson Connect Account"
Fill Form, and then
Click "Finish"
Option 2: If you are existing user of Epson, and "Add a new printer"
Select, "I already have an account"
Click "Add"
Click "Close"

By correctly following above procedure you can easily connect your Epson printer with your windows computer under normal conditions of systems. But, due to technical complexities it might create technical problems in establishing Epson printer connectivity that can be resolved by diagnosing and troubleshooting error.

For 24/7 Help desk click @ Epson Technical Support


Wednesday 25 January 2017

How to Check Epson Printer Ink Cartridge

Epson Software updates over years has made huge progress to provide utility services to its products users. Now, Epson printer Ink cartridge can be monitored with simple steps as shown below. But still customers of Epson printers are facing any kind of trouble with Ink color while printing can call 24/7 active toll free Epson Customer Service Number.

Windows Users

Progress Meter

Dialog box showing Epson printer Ink cartridge Automatically appears on giving print command to printer.

This graphically shows ink levels of different color Epson printer ink cartridge. 

Using this you can measure ink level and refill if required.

Epson Status Monitor 3

  • Step 1: Open Epson printer software
  • Step 2: Click "Utility" tab
  • Step 3: Click "Epson Status Monitor 3" button

New window opens, showing ink level of different ink cartridges and can maintain required ink level.
Epson Help: click here for online tech support

Macintosh Users

EPSON StatusMonitor

  • Step 1: Go to "Epson printer application"
  • Step 2: Select "File menu"
  • Step 3: Click "Print" or "Page Setup", 
 Print Dialog box appears.
  • Step 4: Click on "Utility icon",
  • Step 5: Click "EPSON StatusMonitor"
Check and monitor ink Level, and you can change your Epson ink cartridge accordingly.

Update: Ink-level information, for latest Epson printer Ink cartridge.


Note: Make sure that only specified type of Ink Cartridge is needed to be attached with your Epson printer model to get proper Ink Level for that particular color of Ink cartridge.


Sunday 22 January 2017

3 Steps to Run Epson Connect Printer Setup Utility Software


Epson HelpEpson is very huge manufacturer of printers, scanners, photocopier and FAX machines, in such machines software are also of same concern like hardware. To use such devices they need to be connected with peripheral devices for giving print or to get scanned document. Epson connect setup utility software is an application to establish connection with other devices so as to communicate with Epson Printer.


Epson Support: Three Steps to Run Epson Connect Printer Setup Utility Software:

Step 1: Install Epson Connect Printer Setup Utility software

  • Download Epson Connect Printer Setup Utility software.
  • End-User License Agreement, 
    check box “I accept the terms in the License Agreement”, and click “Next”
  • Next window, click “Install” and in next window click “Finish”

Step 2: Register Printer on Epson Connect Printer Setup

  • New window, Select a Printer:
    Select the printer you want to set up from the list, and then click “Next”
  • Next window, Register or Remove the Printer from Epson Connect Printer Setup
    Select “Printer Registration”, and click “Next”.
  • Next window, License agreement and privacy statement
    Select “Agree”, and click “Next”
  • Next message, Register a printer to Epson Connect
    Click “OK”.

Step 3: Link Epson Connect Account

  • For New User:
    Fill form “Create an Epson Connect Account”, and Click “Finish”
  • For Existing User:
    Select, I already have an existing account
    Fill form “Add a new printer”, and Click “Add"

Get technical assistance @ Epson Customer Support.

Monday 16 January 2017

How to Setup Epson Printer


Non-technical person to setup Epson printer? How to remove errors and Re-setup pre installed Epson printer? How to setup brand new Epson printer? there is some work to done in order to get your printer ready to work. Epson printer drivers and connectivity are the two essential requirements before making it to work. To get full support from expert technicians to setup your old or brand new printer you can call Epson Support.

Turn ON
Plug in power cord to your Epson Printer, turn ON power supply, and press power button on your printer dash board. Make sure that you get red light gets turn ON and you get display ON of your Epson Printer.
After this Step you will be able to you can use photo copier, if its All in One Epson printer.

Install Drivers 
Install Epson printer drivers on the computer that has to be connected with your device, so that you can communicate with it through that system. Each printer has its own design set of drivers that is there with brand new Epson printer or can be downloaded from the online sources, but needed manual installation on the computer.

Connect with Devices
Connect your printer with the computer having installed Epson printer drivers by using one the three modes of connectivity. Connect Epson printer with computer using Ethernet or USB cable and wireless Epson printer can be connected using wireless network through wifi router with many different gadgets. Add your Epson printer on the computer network or wireless network with compatible drivers.
# Email Print is another great feature to use Epson printer by Email connectivity.

After all this you can use your Epson printer for the purpose of Print and Scan. Now can give prints to your printer from connected device or can save scan copies on the connected device to printer. If still you are getting trouble to setup your printer due to any kind of issue you can get full support @ EPSON Customer Service.